Thursday, August 23, 2018

How to set up Netgear Nighthawk router


It is simple to set up the Nighthawk router with NETGEAR Genie. Once you are about to begin the setup process you just need to get the ISP information and ensure that your device has the appropriate network settings. Get an idea here regarding the way to setup for the satellite connections for your netgear wifi router device.
To attain the DSL service, it is better to have the following information:
l  The ISP configuration information for the DSL account
l  ISP login name and password
l  Your Fixed or static IP address 
If you cannot collect the information, you can simply contact your ISP. When your net is working, you may not require to run the ISP or www router login.net

Netgear router login

Steps to setup
There are various steps to set up your router:
1.        Switch ON the router button
2.        Now make sure that your device is connected to the router with either aw wired or wireless setup.
192.168.1.1 Netgear


3.        Open any of your favorite Internet browsers. Further, the screen which will be opened will depend upon if that router has been accessed by you before or not.
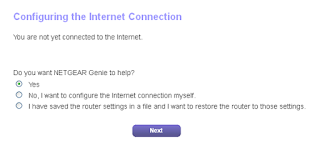
4.        Now follow everything which pops on the window. The NETGEAR genie will lead you to connect to the router to the internet.
5.        If there is an error in displaying the web page then you can do the following:
l  Ensure that the computer is connected to one of the LAN Ethernet ports or wirelessly to the router.
l  Make sure that the router is totally at full power and the LED shows white color.

6.        Go to http://www.routerlogin.net.
If the computer is focussed at some static or fixed IP address, then you must change it to obtain an  IP address directly from the router.
7.        If the router is not able to connect to the internet then you can do the following steps:
a)        Go and review the settings and then make sure you typed everything correctly
b)        Also make sure all your configurations are correct by asking your ISP.


Sunday, August 12, 2018

Netgear router orange light internet


I think many of you are having the issue with Netgear router orange light internet. As you know that “Green” Light is the Best as well as Stable Internet Connection. So if are having the issue with Netgear router orange light internet Blinking then don’t worry. Because in this article we have discussed How to fix Netgear router which is blinking orange.

Why is Netgear router blinking orange?
As we know that everything has some problem. But when it comes to the machine then definitely it will have some problem, when your Router Is blinking in Orange color that means that Your Router is not getting Internet Connection.
www.routerlogin.net

    When your router is having such an issue on that time you must call your Internet Service Provider for checking that Internet is active or not or you can try to connect the computer with modem to check the connection.
    Orange Light Blinking On your router State that You're You have not an active Internet Connection, on such case, You must check Your Routing Setting also.
    When you are facing Such issue you must Reset/restart your www router login net setup. Because many of a time just Simple Restart Fix such Issue.
http //routerlogin.net

    You can Also restart your modem and Netgear router.
Manual Netgear setup
    Open any of the web browsers on to your Computer, then on the address Bar Enter Your Router Default, Ip, address.
    Then on the Next Page Enter Your Router Default Username and password.
    Then click on the Option “I want to configure the router” then click Next.
    Then Click Yes on the Internet connection.
    Then enter your login username which is provided you by your ISP
    Now click on wireless security
    Under wireless security
    Name your ssid (network name )
    Select region
    Select channel 11 and leave it as it
    Mode select auto 108 Mbps
    Now Reboot Your Router and modem. If it Works. Change the network name through all these steps discussed in this blog


Friday, August 10, 2018

HTTP //myrouter.local not working for windows 10


From our couple of days of research, we have found that many of you facing problem in access the Linksys router. And still now if you are facing this problem then do not worry anymore. Because in this article we are going to give the solution. So you must go through this article.
This issue is having may be because of DNS Hijacking Malware that is infecting your computer. DNS Hijacking Malware assigns static primary and secondary DNS values to your computer, which directly affects the router’s access through http://myrouter.local.

    At first, You have to go to your computer and set static DNS values. Then you have to right-click on the Network Connections icon which is located on the system tray, now you have to click on Open Network and Sharing Centre.
 If you want change the details of the admin password just follow the blog here.
log into my Linksys router

    Then you have to Click on the Change adapter settings.
myrouter.local 192.168.1.1

    Now Right-click on the Local Area Connection icon and click on Properties.
    Now you have to Select Internet Protocol Version 4  and click on Properties.
    Now make sure that the Use the following DNS server addresses option is selected.
    Then you have to enter the necessary information in the Preferred DNS server and Alternate DNS server fields.
    Lastly, you have to scan for malware on your computer and make sure that your antivirus software is up-to-date. If it is not up to date then it will not work or will have some problem.

Conclusion
We hope that our service has pleased you. Still now if you have any query relating to this article. Then comment down below in the comment section. We will try to reach Your problem as soon as possible. Follow us for more latest Update.


Saturday, August 4, 2018

NETGEARWifi extender setup without WPS


Enhancing your Wireless Signal is easy with Netgear Wifi Extender. NETGEAR WiFi range extenders enable you to keep mobile devices, media players, and PCs connected to WiFi with a secure connection and expanded coverage.

Here are the steps to for the Netgear wifi extender setup manually without WPS, you can also get the steps for changing the wireless settings for your PR2000 device using this blog:

Netgear wifi extender setup with an Ethernet port:

Netgear_ext

1) Use a PC to connect to the WiFi Extender through the Ethernet cable.
2) Login to the web user interface of the NETGEAR WiFi Extender using http mywifiext net. You will be suggested to enter
Netgear wifi extender setup
a username and password. Default login details are:
l  Username: admin
l  Password: password


3) Now that you have logged in to web interface page all you need to do is to go to Wireless Settings under Setup.
4) Verify the Password (Network Key) field under Security Options.
If the password is not the same as your router password, change it, so it matches. Then click on Apply.
5) Reconnect your Wi-Fi devices to the NETGEAR WiFi Extender.


Netgear wifi extender setup without an Ethernet port:

1) Reset the NETGEAR WiFi Extender to factory default settings.
And to do this, press and hold the Factory Settings button on the side panel for 7 seconds.
2) Connect via Wi-Fi to your NETGEAR WiFi extender.
3)Login to the user interface of your NETGEAR WiFi Extender using http://myWiFiext.net.
You will be prompted to enter a username and password.
Default login details are:
l  Username: admin
l  Password: password

Follow the setup wizard to set up your connection to your router. (Do NOT use WPS when reconnecting to the router)
3) Connect the Wi-Fi devices to the NETGEAR WiFi Extender.


If you are facing troubles with the Wifi extender setup, try the following:

1) For installation and setup assistance, see Installing and configuring NETGEAR WiFi Range Extenders.
For troubleshooting assistance, see Troubleshooting NETGEAR Wi-Fi Range Extenders.
2) To troubleshoot www.mywifiext.net connection issues, see I can’t access www.mywifiext.net; what do I do?.
User manuals and firmware updates for NETGEAR products can be downloaded from NETGEAR Support.